Shopify Connector Guide
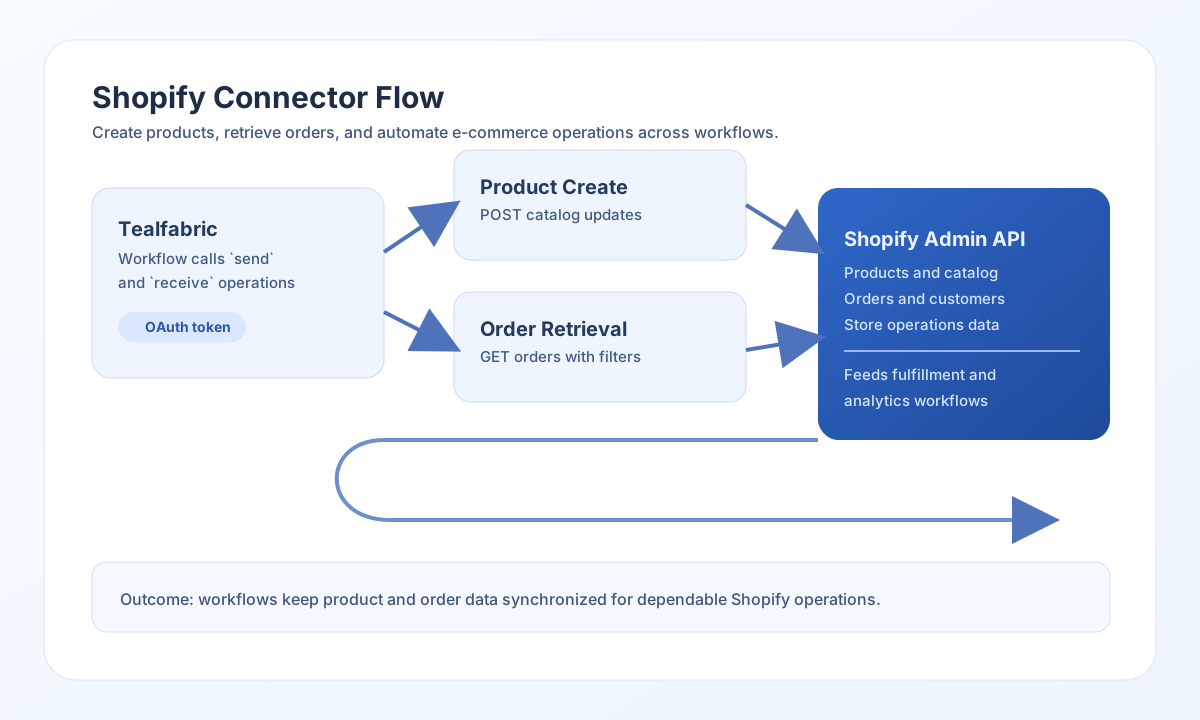
The Shopify connector lets Tealfabric workflows create and retrieve e-commerce data such as products and orders. It is useful for catalog automation, order orchestration, and operational reporting between Shopify and your internal systems.
Document information
| Field | Value |
|---|---|
| Canonical URL | /docs/04_connecting-systems/connectors/s/shopify |
| Version (published date) | 2026-05-08 |
| Tags | connectors, reference, shopify |
| Connector ID | shopify-1.0.0 |
Configure authentication
Set client_id, client_secret, redirect_uri, and shop_domain from your Shopify app configuration. Add access_token after app authorization, and keep scope aligned with the resources your workflow needs to read or write.
Use timeout_seconds based on expected API latency and payload size. Before production use, confirm the app is installed in the target shop and that granted scopes match your operations.
The test operation validates OAuth app configuration (client_id, client_secret, redirect_uri) and returns Configuration validation failed when that check fails. Other operations require a valid access_token and shop_domain but do not re-validate OAuth app credentials on every call.
Create products with send
Use send for create or update operations against Shopify resources. A common pattern is creating products from an internal catalog system.
const baseUrl = "https://api.example.com/api/v1";
const tenantId = "<TENANT_ID>";
const apiKey = "<API_KEY>";

async function createProduct(integrationId: string) {
  const response = await fetch(`${baseUrl}/integrations/${encodeURIComponent(integrationId)}/execute`, {
    method: "POST",
    headers: {
      "X-API-Key": apiKey,
      "X-Tenant-ID": tenantId,
      "Content-Type": "application/json",
    },
    body: JSON.stringify({
      operation: "send",
      endpoint: "products",
      method: "POST",
      data: {
        product: {
          title: "Performance Hoodie",
          body_html: "<p>Breathable hoodie for everyday training.</p>",
          vendor: "Tealfabric Athletics",
          product_type: "Apparel",
          variants: [{ price: "59.00", sku: "HOODIE-ATH-001" }]
        }
      }
    }),
  });
  if (!response.ok) throw new Error(`Request failed: ${response.status}`);
  return response.json();
}
curl -X POST "https://api.example.com/api/v1/integrations/<ENTITY_ID>/execute" \
-H "X-API-Key: <API_KEY>" \
-H "X-Tenant-ID: <TENANT_ID>" \
-H "Content-Type: application/json" \
-d '{
"operation": "send",
"endpoint": "products",
"method": "POST",
"data": {
"product": {
"title": "Performance Hoodie",
"body_html": "<p>Breathable hoodie for everyday training.</p>",
"vendor": "Tealfabric Athletics",
"product_type": "Apparel",
"variants": [{ "price": "59.00", "sku": "HOODIE-ATH-001" }]
}
}
}'
{
  "success": true,
  "data": {
    "message_count": 1,
    "data": {
      "product": {
        "id": 1234567890,
        "title": "Performance Hoodie",
        "status": "active"
      }
    },
    "response": {
      "product": {
        "id": 1234567890,
        "title": "Performance Hoodie",
        "status": "active"
      }
    }
  }
}
Retrieve orders with receive
Use receive to list orders and feed fulfillment, finance, or analytics workflows. Query parameters such as limit, status, and date filters help keep data retrieval scoped and efficient.
const baseUrl = "https://api.example.com/api/v1";
const tenantId = "<TENANT_ID>";
const apiKey = "<API_KEY>";

async function listOpenOrders(integrationId: string) {
  const response = await fetch(`${baseUrl}/integrations/${encodeURIComponent(integrationId)}/execute`, {
    method: "POST",
    headers: {
      "X-API-Key": apiKey,
      "X-Tenant-ID": tenantId,
      "Content-Type": "application/json",
    },
    body: JSON.stringify({
      operation: "receive",
      endpoint: "orders",
      query: {
        limit: 25,
        status: "open",
        created_at_min: "2026-05-01T00:00:00Z"
      }
    }),
  });
  if (!response.ok) throw new Error(`Request failed: ${response.status}`);
  return response.json();
}
curl -X POST "https://api.example.com/api/v1/integrations/<ENTITY_ID>/execute" \
-H "X-API-Key: <API_KEY>" \
-H "X-Tenant-ID: <TENANT_ID>" \
-H "Content-Type: application/json" \
-d '{
"operation": "receive",
"endpoint": "orders",
"query": {
"limit": 25,
"status": "open",
"created_at_min": "2026-05-01T00:00:00Z"
}
}'
{
  "success": true,
  "data": {
    "message_count": 2,
    "data": [
      { "id": 558901, "name": "#1001", "financial_status": "paid" },
      { "id": 558902, "name": "#1002", "financial_status": "pending" }
    ],
    "total_size": 2
  }
}
Test connection with test
Use test to confirm OAuth credentials and shop access via GET shop.json.
{
  "success": true,
  "data": {
    "message": "Shopify connection test successful",
    "details": {
      "shop_domain": "mystore",
      "shop_name": "My Store"
    }
  }
}
Reliability guidance
Most Shopify integration issues are caused by missing scopes, expired tokens, or API throttling. Validate app installation and scope grants first, then confirm endpoint payload structure against the operation you are performing.
For production stability, paginate large reads, implement retry with backoff for rate-limit responses, and handle API errors before passing data to downstream steps. This keeps commerce automations predictable at higher order volumes.