Tealfabric API Usage Guide for WebApps
Document information
- Canonical URL:
/docs/05_apps-webhooks-and-surfaces/12_webapp-api-usage-guide - Version:
2026-09-03 - Tags:
webapps,api,guides
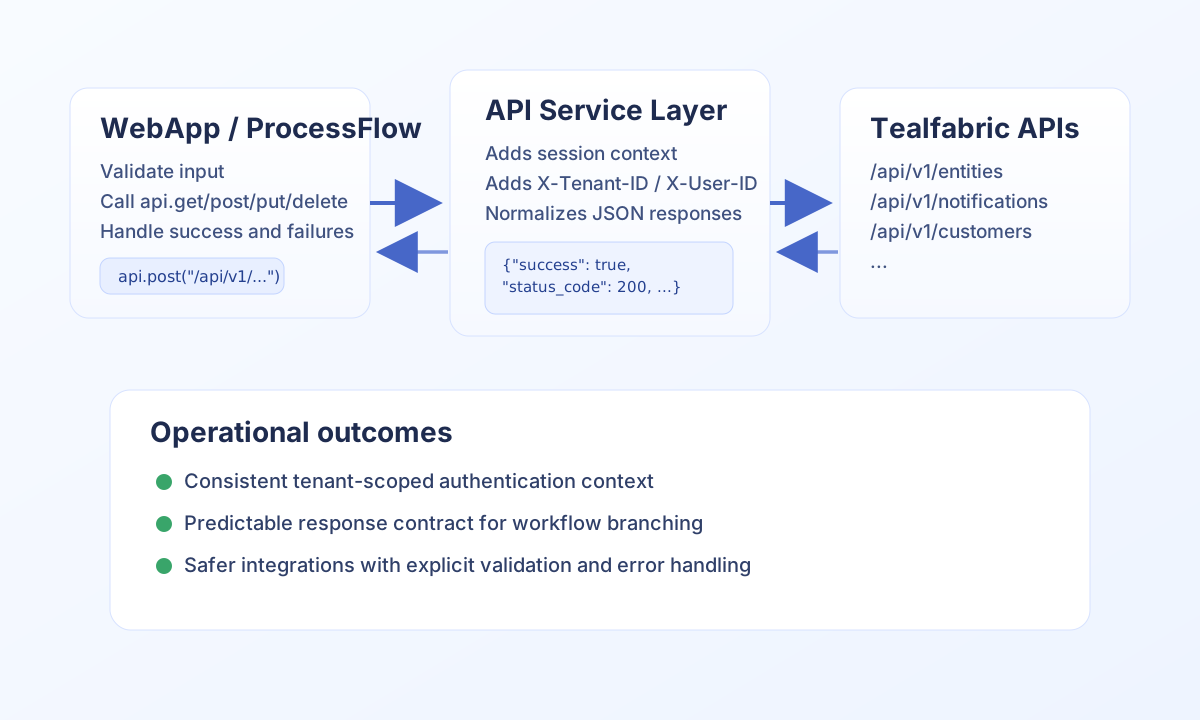
This guide shows how to call Tealfabric APIs from WebApps and ProcessFlow using the api service. It explains how to structure requests, handle responses, and keep integrations secure and tenant-scoped. Use these patterns when your WebApp needs to read platform data, create records, or trigger internal actions.
Start with the api service contract
The api service is the default internal client for Tealfabric endpoints. It supports get, post, put, and delete, and applies session, tenant, and user context automatically. This reduces authentication mistakes and keeps requests aligned with platform security boundaries.
In practice, treat every API call as an explicit contract: send validated input, check success, and branch on status behavior before continuing workflow execution. This keeps ProcessFlow outputs reliable and easier to troubleshoot.
The process api service runs as webapp_user_id (the WebApp service account). That is not the same as end-user Bearer auth on the published WebApp URL. Custom JavaScript that calls the published WebApp (or its /api/* routes) should send Authorization: Bearer with a webapp_access token from jwt.issueWebappAccess. See WebApps Authentication.
type ApiResult<T> = { success: boolean; status_code: number; data?: T };

async function loadEntities(api: { get(url: string): Promise<ApiResult<{ entities?: unknown[] }>> }) {
  const result = await api.get("/api/v1/entities");
  if (!result.success) {
    return { success: false, error: { code: "API_ERROR", message: "Failed to fetch entities" } };
  }
  return { success: true, data: { total_entities: result.data?.entities?.length ?? 0 } };
}
Create and publish safely with explicit input validation
When creating records, validate required values before the API call and return stable error codes for missing or invalid fields. After a successful write, return only the fields other steps need, such as entity_id and a boolean flag. This keeps payloads small and process chains easier to maintain.
type CreateEntityInput = { name?: string; type?: string; metadata?: Record<string, unknown> };
type CreateEntityResponse = { entity_id: string };

async function createEntity(api: { post(url: string, body: unknown): Promise<{ success: boolean; data?: CreateEntityResponse }> }, input: CreateEntityInput) {
  if (!input.name || !input.type) {
    return { success: false, error: { code: "INVALID_INPUT", message: "name and type are required" } };
  }

  const result = await api.post("/api/v1/entities", {
    name: input.name,
    type: input.type,
    metadata: input.metadata ?? {},
  });

  if (!result.success || !result.data?.entity_id) {
    return { success: false, error: { code: "CREATE_FAILED", message: "Could not create entity" } };
  }

  return { success: true, data: { entity_id: result.data.entity_id, entity_created: true } };
}
Test endpoint behavior with curl before wiring UI logic
For endpoint verification, test calls directly with curl so you can confirm headers, response shape, and error behavior before adding client-side logic. Include authorization, tenant context, and JSON content headers in every request to mirror runtime conditions.
curl -X POST "https://<YOUR_DOMAIN>/api/v1/entities" \
  -H "X-API-Key: <API_KEY>" \
  -H "X-Tenant-ID: <TENANT_ID>" \
  -H "Content-Type: application/json" \
  -d '{
    "name": "Northwind",
    "type": "customer",
    "metadata": {
      "source": "webapp_form"
    }
  }'
{
  "success": true,
  "data": {
    "entity_id": "<ENTITY_ID>",
    "name": "Northwind",
    "type": "customer"
  }
}
Handle failures in a way users can act on
Error handling should protect sensitive internals while still giving clear next steps. Log detailed diagnostics server-side, but return stable, user-facing messages such as INVALID_INPUT, NOT_FOUND, and RATE_LIMIT. This protects the platform and gives support teams a consistent way to triage issues.
Related guides
Following these patterns helps you ship WebApp API integrations that are secure, predictable, and maintainable as your workflows grow.