WebApps API Documentation
Document information
- Canonical URL:
/docs/05_apps-webhooks-and-surfaces/08_webapps-api-documentation - Version:
2026-08-13 - Tags:
webapps,api,reference
This guide explains how to manage WebApps through API calls, including creation, updates, version publishing, and operational inspection. It is intended for teams automating WebApp lifecycle tasks or integrating external systems with ProcessFlow-backed forms and pages. The examples below focus on stable request contracts and tenant-safe usage patterns.
API basics
The WebApps API base path is /api/v1/webapps, and every endpoint requires authentication. Use bearer tokens for server-to-server requests, and include tenant context headers where required by your environment policy. Requests should be sent as JSON with explicit Content-Type headers to avoid ambiguous payload parsing.
Core lifecycle endpoints
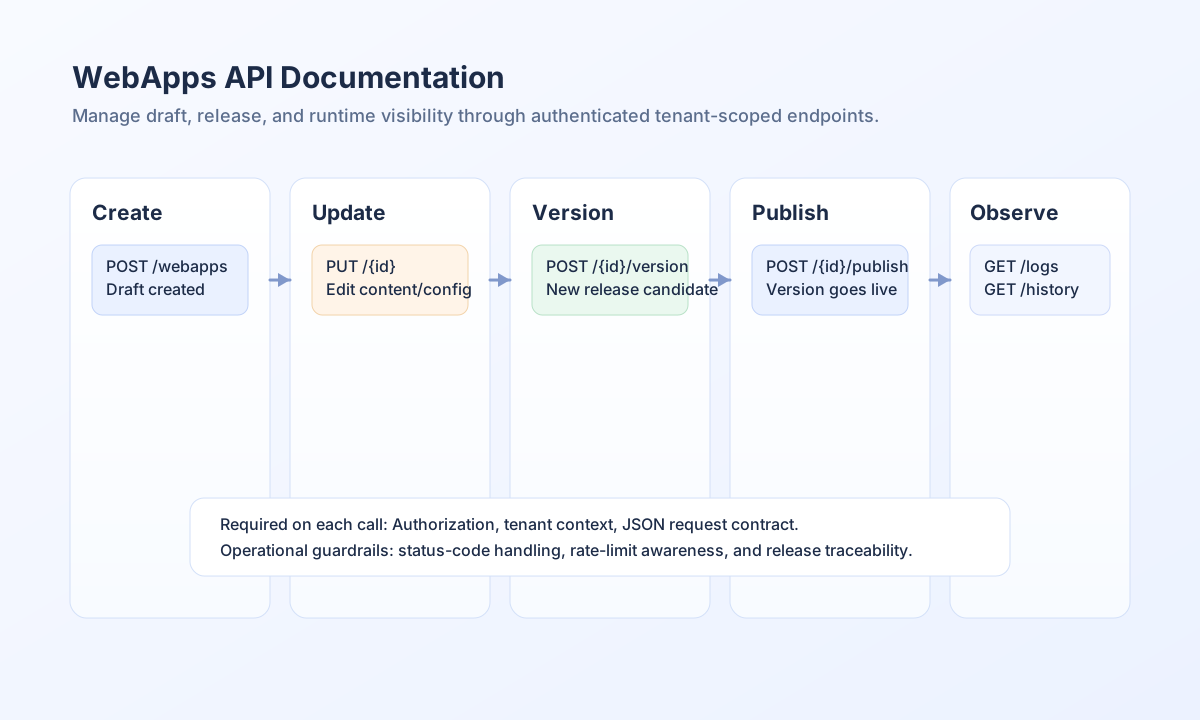
A typical lifecycle starts with creating a WebApp draft, updating content, publishing a version, and then checking logs or history for operations tracking. Treat version publishing as a release step so teams can coordinate review and rollback practices before exposing changes. This model keeps edits safe while preserving a clear audit trail.
Create and publish WebApps programmatically
The following examples keep one intent across languages: create a WebApp draft and then publish a specific version. Keep identifiers explicit (webapp_id, version) so your deployment pipeline remains deterministic.
const baseUrl = "https://api.example.com/api/v1/webapps";
const apiKey = "<API_KEY>";
const tenantId = "<TENANT_ID>";

async function createWebAppDraft() {
  const response = await fetch(baseUrl, {
    method: "POST",
    headers: {
      "X-API-Key": apiKey,
      "X-Tenant-ID": tenantId,
      "Content-Type": "application/json",
    },
    body: JSON.stringify({
      name: "Customer Intake Form",
      webapp_user_id: "<ENTITY_ID>",
      page_content: "<form method='post'><input name='email' required /></form>",
    }),
  });
  if (!response.ok) throw new Error(`Create failed: ${response.status}`);
  return (await response.json()) as { webapp_id?: string };
}
Use curl for release operations
For CI/CD and operational scripts, curl remains the most portable way to publish versions and confirm response structure. Include all required headers and version identifiers so release actions are repeatable across environments.
curl -X POST "https://api.example.com/api/v1/webapps/<ENTITY_ID>/publish" \
  -H "X-API-Key: <API_KEY>" \
  -H "X-Tenant-ID: <TENANT_ID>" \
  -H "Content-Type: application/json" \
  -d '{
    "version": 2
  }'
{
  "success": true,
  "message": "Version published successfully"
}
Monitor execution and version history
After publishing, use logs and version-history endpoints to confirm runtime behavior and deployment lineage. Execution logs help diagnose failed submissions, while history endpoints provide release traceability across teams. This is especially important when multiple editors and automation jobs contribute to the same WebApp lifecycle.
Handle errors and limits predictably
Your integration should always branch on success, capture API errors, and handle expected status codes such as 400, 401, 403, and 404. If your tenant enforces request limits, read returned rate-limit headers and back off before retrying aggressively. A predictable error-handling path prevents noisy failures during high-traffic periods.
See also
The WebApps API is most effective when used as a full lifecycle interface rather than a one-off content endpoint. With clear versioning, release discipline, and operational monitoring, teams can ship WebApp updates safely and consistently.